Menu
- Repairs
- Jeep CJ Upgrades
- Rear Tire Carrier
- Suspension Lift
- Transfer Case Lowering Kit
- Edelbrock Upgrades
- Body Lift
- Beard Seats
- Axle Upgrades
- Locking Hubs
- Stud Conversion
- Rocker Panels
- Gas Tank Skid
- On Board Air
- Rubicon Express Lift
- Sway Bar Disconnect
- D-Ring Mounts
- Roll Cage
- Dual Battery Wiring
- Dual Batteries
- Spring Over Lift
- Wheels
- Speedo Gear
- Jamboree Rack
- CB Antenna Mount
- Fuel Pressure Regulator
- Throttle Body Injection
- Multi Port Injection
- Howell TBI Installation
- MobiWeld Alternator Install
- Install TJ Flares on a CJ
- Quarter Elliptic Install
- EZ Locker Install
- Herculiner
- CJ 4.0 Engine Swap
D-Ring Mounts
D-Ring Shackles
Anyone who has ever been stuck and has had to be pulled out of his or her predicament has probably discovered the need for a good recovery point. Most opt for the tow hooks. They’re relatively inexpensive and generally simple to mount. But for those who desire a more secure attachment, or a more versatile utility, a D-ring shackle or clevis mount is the way to go. R&P 4WD Parts in Oregon City, Oregon offers such a universal bolt-on recovery point.
The mounting bracket is a cast iron design, zinc plated to prevent rusting, and is capable of at least a 3-ton working load (even at a 45-degree angle). The brackets accept a 3/4-inch clevis or D-ring. The bracket will mount to any flat surface with four half-inch bolts. I wanted to mount mine on the front bumper, but the recommended minimum thickness (for the attaching point) needs to be 3/16-inch thick, and the stock front bumper is only 1/8-inch (or two-thirds of what it needed to be). Additionally, rather than just beefing-up the thickness of the bumper, I had to be sure the bumper was securely attached to the frame. So I grabbed my calipers and headed out to the shop...
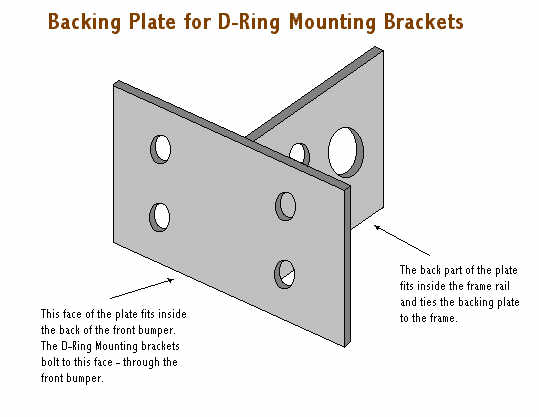
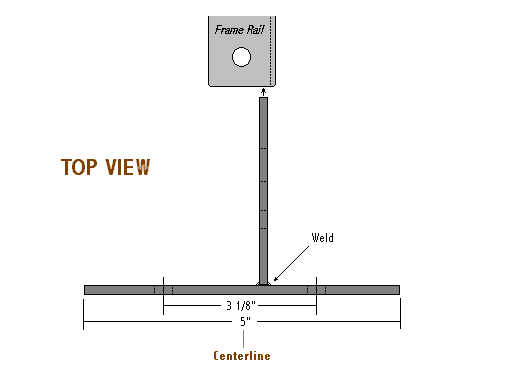
After taking some measurements, I sketched out a rough design of what I needed to make (or in my case, have made for me). My backing bracket is basically a "T" shaped set of plates, made from 3/16-inch steel. The leg of the "T" (side plate) is slightly offset in order to center the D-ring mounting bracket with the CJ’s frame rails. After I had figured all the overall dimensions of the backing brackets, I had them made at a local metal fabricator shop. It cost me $26 and only took them a couple hours. The only hole I knew I needed at the time was the large 1" diameter access hole (to accommodate the one on the side of the frame rail), so I had those drilled for me when the plates were made. (I can't remember the dimension, but measure back from the front edge of the frame rail to determine its location.)

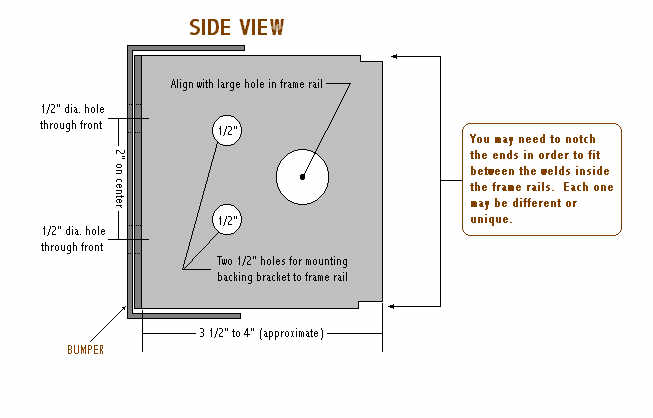
Once I was ready to install the backing brackets into the frame, I pulled the front bumper off and slid the side plate into the inside of the frame rail. I needed to cut some slight notches on the top and bottom edges of each of the side plates in order to mount the plates flush with the inside of the frame rails. (A bench grinder works great for this.) Once I did this, I identified each backing bracket with a felt pen.

After I was able to flush-mount the backing brackets to the frame rails, I drilled two 1/2-inch holes through each of the frame rails between the large access hole and the front of the frame rail - but closer to the access hole. Be sure you anticipate the lengths of your mounting hardware when you locate the holes! These holes will be where I attach the backing bracket to the frame. After the two frame rails were drilled, I held the backing bracket in the frame rail - adjusted as necessary - and marked the corresponding holes on the side plate of the backing bracket. I then placed the brackets into a vice and drilled the two 1/2-inch holes on each bracket (shown above).
After drilling, I installed the backing bracket onto the frame. Next I placed the front bumper back on the frame rails and loosely installed the four bolts through the holes to insure I had the bumper in the right place. With the bumper on, I then aligned where I wanted to install each the cast D-ring brackets - centered with the frame rails. Using the cast D-ring bracket as a guide, I marked the four 1/2-inch holes for each side. I removed the bumper and drilled each of the holes (eight in total).
After the eight holes were drilled, I installed the bumper again, and marked the corresponding spots on the front panel of the backing brackets using the holes I’d just drilled through the bumper as a guide. Once again, I removed the bumper and then removed the two backing brackets, and drilled the four holes through each bracket’s faceplates.

Whew! Finally, after smokin' a few drill bits (use oil to keep them cool) everything was ready to be installed for the final time. Since these D-rings are going to hold a considerable amount of weight, quality hardware is absolutely necessary. For the front four mounting bolts (for each cast D-ring bracket) you’ll want to use Grade 8 bolts. The Grade 8 has a higher tinsel-strength rating than does a Grade 5. For the two bolts that will hold the backing brackets to the frame, I also used Grade 8 bolts. The hardware for these two bolts will have to endure a high sheer strength, rather than a high tinsel strength. Somewhere I remember reading that a Grade 5 bolt may have a higher sheer strength than a Grade 8. I couldn’t find anyone to confirm my recollection, so I stuck with the Grade 8. I wanted to use short bolts here, so they wouldn’t interfere with the four bolts coming through the bumper and backing plate, or the two bolts holding the bumper to the frame.
When you’re finished, you’ll have a secure place to attach your winch cable to (if you’re using a snatch block on yourself to double the pull), or to tow your Jeep if ever it becomes necessary.
Need one for the rear? Here's a quick view of a clevis mount that attaches to a 2-inch receiver hitch point. These are made by Warn Industries.


